Run your webapps on Kubernetes for cheap
TL;DR
This post details how to spin off a 3 node Kubernetes cluster on Google Cloud, paying close to 7 dollars a month for it and host multiple database backed dynamic websites and API apps.
Disclaimer
This is a hands on article to get started with Kubernetes. Some of the terminology and descriptions in this article have been simplified to make it approachable to people unfamiliar with Kubernetes. For technical purity, Kubernetes’s official documentation can be consulted.
Intro
Kubernetes is the new cool kid on the block (bye bye blockchain!). Listing it as an skill in your LinkedIn profile will definitely get you some recruiter attention. It is the solution for all your dev-ops woes!
I used to run all of my hobby projects in docker containers with lifecycles managed by docker-compose files. I had a VM from scaleway with 4 gigs of memory, 100 gigs of SSD storage and dual core x86 CPU for which I used to pay around 5 Euros a month. I was happy until I learnt about Kubernetes and then I realized ignorance is bliss. After reading this post, you will be able to spin off a 3 node Kubernetes cluster on Google Cloud with 0.6GB memory each and 1 vCPU each and pay roughly ~7 dollars a month for it! If you want a beefier cluster you can choose a different configuration for nodes and for 40 dollars a month you get 11.25GB of memory at your disposal, three compute cores with which you can do wonders - host several high traffic webapps backed by different databases! Adding to that, with Google Cloud’s free trial program you can have this cluster running for free for almost an year!
My three node cluster currently runs mongodb, postgres, nginx, two rails web applications, a nodeJS web application, a dotnetcore web application, a spring boot based Java REST API application
which powers an Android app, and still has a lot of resources remaining to do 3-4 times more of what it currently does. All the web apps are fronted by nginx and configured with different server blocks
for different domain names (a.k.a virtual hosts). All the domain names have their own letsencrypt https certificates that automatically renew every three months. Two of the apps use mongodb and
the other two postgres.
Single VM vs Cluster
Running all your workloads in a single VM is like putting all the eggs in the same basket. If ever the VM is restarted for updating the Kernel, reclaim some leaked memory or something else; all the apps hosted on the box incur downtime. Running on Kubernetes is better, because:
- Cloud provider (GCP) manages updates and patches on your VMs, so you don’t need to explicitly restart nodes. In case of node restarts, Kubernetes ensures relocating workloads running on the unavailable VM.
- Kubernetes restarts containers automatically when underlying process crashes due to some issue.
- Kubernetes handles load balancing of requests and scaling of resources to fulfill the requests. For example, you can tell Kubernetes declaratively to run more instances of your webapp when the load is higher.
- Kubernetes sets up internal networking in the cluster so that your apps can talk to each other. This enables you to build microservices based large scale services.
Besides, using Kubernetes to run your compute infrastructure is considered cool in 2019!
What is Kubernetes?
Kubernetes’s official website writes:
Kubernetes is a portable, extensible open-source platform for managing containerized workloads and services, that facilitates both declarative configuration and automation.
This might not be quite an approachable description for everybody. Here is my attempt:
Kubernetes is like an operating system, for your distributed computing cluster that lets you run your scalable applications without being bothered about nodes in the cluster going down, request routing, load balancing, networking and other devops hassles.
Let’s get started
Step 1: Setup a 3-node cluster on Google Cloud
Register on Google Cloud, if you already haven’t. Create a project, setup billing. Click the hamburger menu icon ( ) on the top left, and in Compute section,
click Kubernetes Engine. Click the
) on the top left, and in Compute section,
click Kubernetes Engine. Click the Create Clusters button. Make sure in the left pane, cluster template is set to Standard cluster. In the right pane, name your cluster;
for example blog-cluster. Fill in the settings as listed below:
- Location type: Zonal
- Zone: us-central1-a
Under node pools:
- Number of nodes: 3
- Machine type:
n1-standard-1(this will cost roughly $40/month for 3 nodes). Choosef1-microfor $7/month instead.
Click More node pool options and ensure that the following are set:
- Enable autoscaling: off
- Boot disk type: Standard persistent disk
- Boot disk size: 10 GB
- Enable pre-emptible nodes: Yes - you must do this for cost cutting. These nodes get terminated within 24 hours and get replaced with another one and cost around one-fourth of regular nodes. Since Kubernetes can handle node downtimes, we need not worry about our app going down when GCP replaces a VM.
Click Availability, networking, security, and additional features and ensure the following:
- Enable HTTP load balancing: No - this is costly! We will use Kubernetes’s default balancer
- Enable Stackdriver Logging service: No
- Enable Stackdriver Monitoring service: No
- Enable Kubernetes Dashboard: No
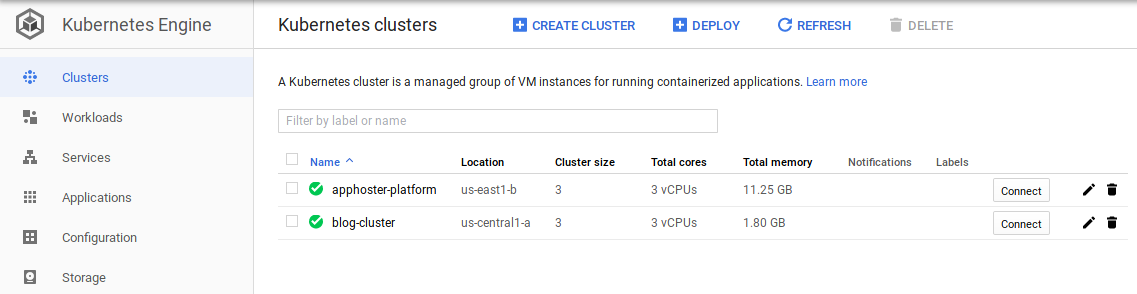
Leave all the other settings to their sane defaults. Changing some of them might cost you extra money. Click the Create button and wait for the cluster to come up. The clusters page should
show your newly created cluster.
Step 2: Connect to your newly minted cluster
Install kubectl command line utility for your OS. In the Clusters page, click Connect and it will show you a gcloud command which downloads the necessary authentication information
for the kubectl command. Run the command. Once you have done that, test your connection by running kubectl get nodes which should return you a list of three nodes.
% kubectl get nodes
NAME                                          STATUS   ROLES    AGE   VERSION
gke-blog-cluster-default-pool-edcca0b2-4mf2   Ready    <none>   1m    v1.11.7-gke.12
gke-blog-cluster-default-pool-edcca0b2-hd1p   Ready    <none>   1m    v1.11.7-gke.12
gke-blog-cluster-default-pool-edcca0b2-z6f1   Ready    <none>   1m    v1.11.7-gke.12
Step 3: Prepare your first application
Let’s prepare a rails application that uses a postgresql database to deploy on this cluster. We will name it RailsPortal, you are free to name whatever you want.
gem install bundler
gem install rails
rails new RailsPortal
bundle exec rails s
Last command should start a local server at port 3000 and you should be able to access it at localhost:3000. Stop the server by running Ctrl-C. Open config/database.yml and around the
end change the production db connection settings so that they look like this:
production:
  <<: *default
  adapter: postgresql
  url: <%= ENV['DATABASE_URL'] %>
Also, edit the Gemfile and add a line gem 'pg' then run bundle update. The above changes will configure the production instance of app to use postgresql instead of default sqlite and
will let us pass the postgresql connection string through an environment variable that Kubernetes will setup for us later.
Let’s create a scaffold with two fields and see whether things are working fine.
bundle exec rails g scaffold User name:string about:string
bin/rails db:migrate RAILS_ENV=development
This will generate necessary views and controllers which we can use to insert some data and ensure that things are working fine. Second command will commit pending database migrations.
Start the server again by running bundle exec rails s and access the url http://localhost:3000/users and click New User and try adding a new record.
Now that our test application is ready, let’s containerize it. If you do not have docker installed, now is the time to install it and start the docker service.
Once we build the container, we want to push it to a private docker repository. Docker Hub lets you store container images for free. Register on their website then connect
your local docker command to your docker hub account by running the following command:
docker login --username=DockerHubUsername --email=DockerHubEmail
For building the container image, we need to create a file named Dockerfile which tells docker how to build the container. Create this Dockerfile in rails portal’s root directory.
FROM ruby:2.5-alpine

RUN apk add --no-cache --update nodejs postgresql-dev libpq tzdata imagemagick
RUN apk add --no-cache --update --virtual build-deps build-base git
RUN cp /usr/share/zoneinfo/UTC /etc/localtime

COPY . /app

WORKDIR /app
RUN echo 'gem: --no-document' > /etc/gemrc
RUN bundle install --jobs 4 --without development test

RUN apk del build-deps
Make sure the ruby version in Dockerfile is consistent with the one in Gemfile. Now build and push the container to docker hub by running following commands:
docker build -t DockerHubUsername/RailsPortal .
docker push DockerHubUsername/RailsPortal
Step 4. Architect your infrastructure
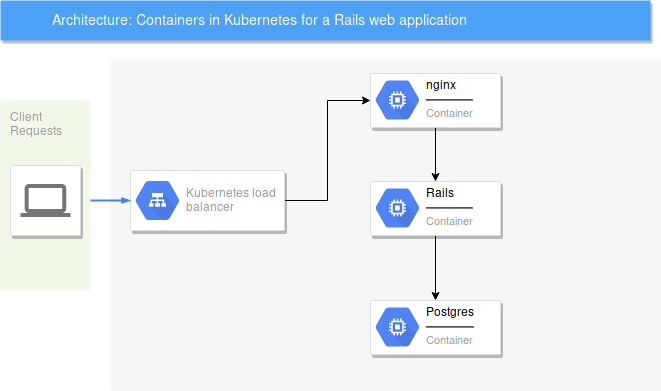
We are going to use a simple architecture client -> Webserver (nginx) -> Web app (rails) -> Database (postgres) which is quite popular for single VM setups too. Only difference is that instead of processes running on a VM, these will be containers and will be run on different nodes of the cluster by Kubernetes.
Step 5. Plan Kubernetes resources
Kubernetes has the concept of resources. The ones we are going to use in this project are:
- Deployment
- Service
- StorageClass
- PersitentVolumeClaim
- PersistentVolume
- Secret
- ConfigMap
A deployment describes a container to run along with the volumes it needs, environment variables, ports it should listen to, number of replicas of it Kubernetes should run in the cluster etc. There are many more things we can configure for a deployment, but these are the ones we are going to use in our little project. In this article, I might use the terms deployment and container interchangeably - because in practice a Kubernetes deployment is a container running in the cluster.
A service fronts a deployment by giving it a stable private or public endpoint on which the deployment (running container) can be accessed. Private endpoints are exposed by service of type ClusterIP and public endpoints are exposed by service of type LoadBalancer. Private endpoints are accessible only inside the cluster, from other containers. For example, a postgres deployment should only be accessible from deployments running in the cluster, for example a web application.
A storage class is to define the characteristics of volumes that can be created on demand. We create this once and create persistent volume claims that refer to it.
A persistent volume is a storage accessible from any of the running containers on the cluster which are configured to access it. As containers are stateless, we need a reliable persistent store to store our stateful data, for example postgres’s data files.
A persistent volume claim is an access mechanism for a container to access a persistent volume. We will talk about it ahead in the article when we need it.
A secret is used to store authentication credentials and expose it to only the resources that need it.
A config map is a keyvalue pair, that can be used to store configuration information in the cluster which can be used from a container.
Kubernetes provides us a declarative way of telling it about the resources we need to create (a goal state of our infrastructure) and then it tries to create those resources (or achieve the goal state). We declare the properties for resources in yaml files and Kubernetes takes care of it.
For our little project, we will be creating the following resources:
- A deployment for nginx, which we will use to front our web applications (rails)
- A service of type load balancer for nginx, such that users can access our applications from external the internet
- A config map for the nginx configuration files
- A secret to store authentication information for docker hub so that kubernetes can pull the rails application container that we pushed to our private docker hub repository
- A deployment for rails portal, whose container we built in step 4
- A service for rails portal, so that nginx can access it forward requests to it
- A deployment for postgres, which will run the container
- A service for postgres so that rails application can connect to it
- A storage class for postgres that defines the kind of storage to be used for persistent volumes. E.g, SSD/magnetic etc.
- A persistent volume claim for postgres so that the postgres deployment can access the persistent volume
- A persistent volume for postgres, so that we can have postgres store its data files there
Step 6. Setting up nginx
Let’s begin by creating a deployment for nginx. Create a directory named nginx. Below gist is for a yaml file that we will use to describe nginx deployment on Kubernetes. Copy
its contents to a file named nginx-dep.yml on your local computer.
It declares that we want to create a resource of type Deployment, label it with name nginx, use the container nginx with tag mainline-alpine, and expose the container’s port 80.
By default the container image is pulled from docker hub. Now run kubectl apply -f nginx-dep.yml to let Kubernetes do its magic.
% kubectl apply -f nginx-dep.yml
deployment.apps/nginx-dep created
% kubectl get pods
NAME                         READY   STATUS    RESTARTS   AGE
nginx-dep-776c646dc6-g4w9x   1/1     Running   0          25s
The output of last command tells us that an nginx deployment is running since 25 seconds. Yes, you just noticed that we used a new term pods in the command. A pod can be considered as an application
for all practical purposes. You can find about it more in official Kubernetes documentation.
Let’s create an LB now so that we can access the running container from outside. Copy the below contents to a file named nginx-svc.yml.
This file declares that we want a resource of kind Service of type LoadBalancer which should accept connections on port 80 and direct to port 80 of a service. Which service? The service is selected
using the selector parameter which says to match it with the app: nginx which we had specified in our nginx-dep.yml file. Let’s deploy this file too.
% kubectl apply -f nginx-svc.yml
service/nginx-lb created
% kubectl get svc
NAME         TYPE           CLUSTER-IP      EXTERNAL-IP   PORT(S)        AGE
kubernetes   ClusterIP      10.59.240.1     <none>        443/TCP        4m
nginx-lb     LoadBalancer   10.59.240.108   <pending>     80:31463/TCP   24s
This shows that the resource with name nginx-lb and type LoadBalancer has been created. But it is pending an external ip. Wait for some time and run the command again to get the external ip.
% kubectl get svc
NAME         TYPE           CLUSTER-IP      EXTERNAL-IP    PORT(S)        AGE
kubernetes   ClusterIP      10.59.240.1     <none>         443/TCP        5m
nginx-lb     LoadBalancer   10.59.240.108   34.66.92.238   80:31463/TCP   1m
Now, if you try typing the shown external ip in a browser, you should be able to get the nginx’s welcome page! Awesome! You can change a domain’s A record to point to this IP address and this will be accessible from any browser through the domain name.
Step 7. Setting up postgres
Our webapp will need Postgres to store its data. Since we need postgres’s data to be persistent across container and node restarts, we need to create a persistent volume. For that we first
create a storage class with type SSD. Then we create a persistent volume claim that uses this newly created storage class. A persistent volume gets automatically created, when we try to create
a persistent volume claim using the storage class of kubernetes.io/gce-pd. We can also club two related storage related declarations into a single yaml file as shown below.
Let’s create the resources from this yml file and check their statuses.
% kubectl apply -f postgres-storage.yml
storageclass.storage.k8s.io/postgres-ssd created
persistentvolumeclaim/postgres-disk-claim created
% kubectl get pvc
NAME                  STATUS   VOLUME                                     CAPACITY   ACCESS MODES   STORAGECLASS   AGE
postgres-disk-claim   Bound    pvc-79f8200b-5c64-11e9-978f-42010a800070   1Gi        RWO            postgres-ssd   12s
% kubectl get pv
NAME                                       CAPACITY   ACCESS MODES   RECLAIM POLICY   STATUS   CLAIM                         STORAGECLASS   REASON   AGE
pvc-79f8200b-5c64-11e9-978f-42010a800070   1Gi        RWO            Delete           Bound    default/postgres-disk-claim   postgres-ssd            12s
Now that our storage for postgres is all set, we can create the deployment and service. Let’s club both the declarations in the same yaml file as we did with the storage. Its a good practice to club logically related resources in a single file.
In the deployment, we specify that we will run the postgres container with tag 10-alpine from docker hub. We also set environment variables for username, password and data directory. You
should note that we specify a volume mount and configure it to use the persistent volume claim we created earlier and we mount that 1GB storage volume at /data directory in the container.
We also create a service (with type ClusterIP being the default) and configure its app selector to postgres and specify that port 5432 on the container be made available for other apps in the cluster.
Let’s create the service and deployment and check the status on the cluster.
% kubectl apply -f postgres-dep.yml
deployment.extensions/postgres created
service/postgres created
% kubectl get pods
NAME                         READY   STATUS    RESTARTS   AGE
nginx-dep-776c646dc6-g4w9x   1/1     Running   0          8m
postgres-6969669b9f-4f42h    1/1     Running   0          54s
% kubectl get svc
NAME         TYPE           CLUSTER-IP      EXTERNAL-IP    PORT(S)        AGE
kubernetes   ClusterIP      10.59.240.1     <none>         443/TCP        15m
nginx-lb     LoadBalancer   10.59.240.108   34.66.92.238   80:31463/TCP   7m
postgres     ClusterIP      10.59.243.25    <none>         5432/TCP       48s
Great! We got postgres running and available on our cluster. Let’s login to the container and create a database that will be used by the rails portal to store its data.
% kubectl get pods
NAME                         READY   STATUS    RESTARTS   AGE
nginx-dep-776c646dc6-g4w9x   1/1     Running   0          17m
postgres-6969669b9f-4f42h    1/1     Running   0          2m
% kubectl exec -it postgres-6969669b9f-4f42h -- /bin/sh
/ # su postgres
/ $ psql -d postgres
postgres=# CREATE DATABASE railsportal;
CREATE DATABASE
Through the first command we copied the name of the pod. Then the next command connected to the running container, and mounted its shell (tty) in interactive mode with our terminal and then ran /bin/sh
on the terminal. This directly dropped us into the container’s shell, wehere we switched to the user postgres, then ran psql and created a database. Logging-in to a running container comes handy
a lot during debugging sessions.
Step 8. Deploy the rails application
Since, we pushed our rails application to a private docker repository on docker hub and we do not want the world to be able to access it because it has our intellectual property (;p), Kubernetes won’t be able to pull the image without authentication information. Let’s create a secret that stores our docker hub username and password.
kubectl create secret docker-registry dockeraccess --docker-server=https://index.docker.io/v1/ --docker-username=YourDockerHubUsername --docker-password=YourDockerHubPassword --docker-email=YourDockerHubEmail
The deployment yml file looks as follows:
% kubectl apply -f rails-portal-dep.yml
deployment.extensions/railsportal created
service/railsportal created
% kubectl get pods
NAME                           READY   STATUS    RESTARTS   AGE
nginx-dep-776c646dc6-g4w9x     1/1     Running   0          1h
postgres-6969669b9f-4f42h      1/1     Running   0          1h
railsportal-7d6d74f865-n6x56   1/1     Running   0          31s
If your container status is CrashLoopBackoff because of some changes you made, you may debug by using the command kubectl describe pod PodName.
We need to make changes to nginx config so that nginx forwards all the requests to RailsPortal. For that, let’s go back and change the config so that we pass a nginx config file
while starting the container. Create a file named nginx.conf with the following content:
Create another file named railsportal.nginx.conf with the following content:
Now create two config maps for these files in the cluster:
% kubectl create configmap nginxconfig --from-file=./nginx.conf
configmap/nginxconfig created
% kubectl create configmap railsportalnginxconfig --from-file=./railsportal.nginx.conf
configmap/railsportalnginxconfig created
Update the nginx-dep.yml and append the config map settings at the end of the file so that it becomes like below:
Now apply the updated configuration for nginx to the cluster:
% kubectl apply -f nginx-dep.yml
deployment.apps/nginx-dep configured
Opening the website with the public IP should show the rails portal. You can check the logs by running kubectl logs PodName where PodName should be replaced with the name of the pod for rails
portal that comes up when you run kubectl get pods. If things are not working as expected, you may try logging into the container and poke around.
Home work
You can try deploying another application on the same cluster. A ExpressJS webapp, talking to a mongoDB database would be a good exercise. You may also go ahead and figure out how to enable auto scaling. And you may try doing this on Azure or AWS and figure which one comes up cheapest.
Next steps
Now that we have successfully setup our rails application in Kubernetes, in the next article we will do the following:
- Enable HTTPS access with Letsencrypt certs and setup auto renew
- Make nginx serve static assets, instead of Rails
- Setup auto scaling for times of high load
cloud kubernetes docker